
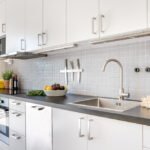
If you’re looking for a budget-friendly way to refresh your kitchen or bathroom, upgrading to Shinnoki Ivory Oak cabinets is a great choice. These pre-finished, high-quality wood veneers offer a luxurious look without the high-end price tag. Plus, with the right tools and guidance, you can install them yourself, saving money on labor while achieving a modern, stylish finish.
Inspired by Chip Gaines’ hands-on, step-by-step approach, this guide will walk you through the DIY installation process so you can transform your space quickly and affordably.
Why Choose Shinnoki Ivory Oak Cabinets?
Shinnoki cabinets are pre-finished, real wood veneers designed for homeowners and DIYers who want a high-end look without the hassle of staining or sealing. Here’s why they’re a fantastic option: ✔ Warm & Modern Finish – The Ivory Oak color blends seamlessly into contemporary, farmhouse, and Scandinavian-inspired spaces. ✔ Budget-Friendly Luxury – Achieves the look of custom cabinetry at a fraction of the cost. ✔ Durable & Pre-Finished – No need for sanding, staining, or sealing—just install and enjoy. ✔ Eco-Friendly & Sustainable – Made from responsibly sourced wood, making them a greener choice. ✔ Easy to Install – Designed for DIY installation, saving you money on labor costs.
💡 Pro Tip: Shinnoki cabinets are great for kitchens, bathrooms, laundry rooms, and even home offices, offering a sleek, versatile style.

Tools & Materials Needed
Before starting your installation, gather the following supplies: ✔ Shinnoki Ivory Oak cabinet panels and hardware ✔ Tape measure ✔ Level ✔ Power drill & screwdriver ✔ Stud finder ✔ Clamps ✔ Wood glue & wood screws ✔ Shims for leveling ✔ Pencil & painter’s tape for marking ✔ Circular saw (if trimming is needed) ✔ Cabinet mounting brackets (if applicable)
💡 Pro Tip: Always double-check measurements before cutting or drilling to ensure accuracy.
Step 1: Prepare Your Space
✔ Remove Old Cabinets – If replacing existing cabinets, carefully remove them using a screwdriver or drill. ✔ Check Wall Condition – Patch any holes and ensure the wall is level. ✔ Mark Studs & Measurements – Use a stud finder to mark where the cabinets will be secured. ✔ Lay Out Your Design – Place painter’s tape on the wall to visualize placement.
💡 Pro Tip: If your floor is uneven, install shims under the base cabinets for a level fit.
Step 2: Install the Base Cabinets
- Start in a Corner – Always begin installing base cabinets first.
- Attach Cabinets to the Wall – Secure them to the wall studs using wood screws.
- Check for Levelness – Use a level and shims if necessary to ensure everything aligns properly.
- Fasten Cabinets Together – Use clamps to hold adjoining cabinets together, then secure them with screws.
💡 Pro Tip: Leave at least 1/4-inch clearance between cabinets and walls to allow for expansion.


Step 3: Install the Upper Cabinets
- Measure & Mark Cabinet Heights – Standard upper cabinets are 18 inches above the countertop.
- Secure a Temporary Ledger Board – This provides support while mounting the cabinets.
- Lift and Secure Each Cabinet – Drill through the back panel into wall studs.
- Attach Cabinets to Each Other – Align the frames and fasten them together with screws.
💡 Pro Tip: Use a helper or cabinet lift for heavy upper cabinets.
Step 4: Install Cabinet Doors & Drawers
✔ Attach Hinges to the Cabinet Frames – Ensure soft-close hinges are properly aligned. ✔ Mount the Doors – Adjust hinges for even spacing. ✔ Install Drawers & Glides – Follow manufacturer instructions for smooth operation. ✔ Add Handles & Knobs – Measure twice to ensure even placement.
💡 Pro Tip: Use a template or jig to ensure all handles are aligned perfectly.
Step 5: Finishing Touches
✔ Fill Any Gaps with Trim or Caulk – For a seamless look, add finishing trim where needed. ✔ Install Toe Kicks & Crown Molding – Enhances the look and hides imperfections. ✔ Clean & Inspect – Wipe down surfaces and check for any needed adjustments. ✔ Enjoy Your New Kitchen! – Stand back and admire your DIY transformation.
💡 Pro Tip: Protect your cabinets with felt pads under items that might scratch the surface.
Read More in Budget Kitchen Essentials Blog
- 6 Smart Benefits of Hiring a Home Improvement Company in Rathdrum ID
 Learn how a Home Improvement Company in Rathdrum ID enhances your home with expert upgrades.
 - Kitchen Cabinet Fitting Contractor in Sagle ID: A Practical Guide for Homeowners
 Upgrade your kitchen with expert cabinet fitting. Discover how a Kitchen Cabinet Fitting Contractor in Sagle ID transforms your space.
 - Bathroom Renovation Installer in Sandpoint ID: Expert Answers for Homeowners
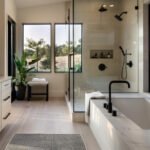 Planning a bathroom remodel? Discover expert answers from a Bathroom Renovation Installer in Sandpoint ID to help you design, budget, and complete your renovation successfully.
How Much Does It Cost?
Cabinet refacing or DIY installation with Shinnoki Ivory Oak panels is significantly more affordable than custom cabinetry. ✔ Shinnoki Cabinet Panels – Starting at $50–$150 per panel. ✔ Soft-Close Hardware & Hinges – Around $5–$10 per hinge. ✔ Handles & Knobs – Ranges from $2–$20 each. ✔ Total DIY Cost Estimate: $1,500–$5,000 (depending on kitchen size).
💡 Pro Tip: Check for seasonal discounts at home improvement stores for added savings!
Final Thoughts: Is Shinnoki Ivory Oak Right for You?
If you want a budget-friendly, high-end look without hiring a contractor, Shinnoki Ivory Oak cabinets are a fantastic DIY option. Here’s why they’re worth considering: ✔ Easy to install with pre-finished surfaces. ✔ Cost-effective compared to custom cabinets. ✔ Modern, warm oak finish that works in any space. ✔ Durable and sustainable for long-term use.
By following this step-by-step guide, you can give your kitchen a custom-designed appearance without the custom price tag. So grab your tools, roll up your sleeves, and start your DIY Shinnoki Ivory Oak transformation today!